Basic Programming
Digital vs. Analog Devices
For VEX Robotics, the difference between analog and digital sensors is simple. Digital sensors are buttons, switches, and LED lights. A digital sensor can only have two possibilities: it can either be pressed or not pressed, on or not on, etc., and that’s what defines it to be a digital sensor. Digital sensors can only have two values. These values are either 1 for “pressed” or 0 for “released.”Here are some pictures of digital sensors:
Bump Switch
Here is a bump switch, also known as a bumper switch. A bump switch is an input device. |
Limit Switch
Here is a limit switch. A limit switch is an input device. |
VEX LED
Here is a green VEX LED light. An LED light is an output device. |
Analog sensors are different because they can sense a wide range of values. A light sensor, for example, can have values ranging from 0-4095. A light sensor is an analog device because there are more than two different wavelengths of light for the light sensor to detect. Here is an example of an analog devices:
Line Follower

Here are three line followers. Line followers are input devices.
Another type of device is a motor. There are usually three different types of motors (at least in our classroom): a servo motor, a VEX 269 motor, and a VEX 393 motor. The difference between a VEX 269 and a VEX 393 is that the VEX 393 is larger in size and has a higher torque or voltage. All motors have values ranging from 0-127, with 0 being “nothing/no movement” to 127 which is “full power”. Here are some motor sensors:
Servo Motor
Here is a servo motor. A servo motor is an output device. |
VEX Flashlight
A flashlight is also a motor, it is an output device. |
All of these devices are plugged into a VEX Cortex, which is plugged into a computer. Some of the motors have two wires while other devices have three. A two-wire motor is either plugged into ports 1 and 10, or they could be plugged into ports
2-9 with a wire that converts the two wires into three wires so that you could insert them into the three-wire ports.
2-9 with a wire that converts the two wires into three wires so that you could insert them into the three-wire ports.
Inputs vs. Outputs
Input devices sense the environment which they are in by ways of rotation, light, or physical touch. They provide the processor (VEX Cortex) the information the robot needs by sensing the environment.
Output devices are the devices that are controlled by the processor. A user can insert values into a code to make a device perform a task. Output devices produce sounds, light, and motion.
Output devices are the devices that are controlled by the processor. A user can insert values into a code to make a device perform a task. Output devices produce sounds, light, and motion.
Coding
Now that you know the basics of some devices, I can now show you how to code. For this, I will use the VEX Natural Language. Behaviors are anything that a robot does, like spinning an axle or turning on a light. There are three main categories of behaviors: complex, simple, and basic behaviors. A complex behavior is a complex task such as pressing a button to make the vehicle drive forward and turn on its light until its sonar senses a wall.
A way we can organize our behaviors is by using pseudocode. Pseudocode appears as green text after // (the // indicates that all of the text after and before is not part of the actual code, just pseudocode). If you want your pseudocode to be a paragraph use /* before the text and */ after the text.
A complex behavior is made up of more than one simple and basic behavior.
Here is a picture to help illustrate the concept:

So now that I have provided you a very brief description of pseudocode, I will now tell you about some important pieces of code.
Task main() is very important because it tells the processor that the main task is the following code. You will use it almost always first. Insert the code between the {} following the task main. If you have {{{(3 braces) but only}} (2 braces) inside your code, you’ll need another brace to match the three previously unmatched braces.
Another important function is the while loop. A while loop is inserted to make the processor check to see if the condition is true. When you insert while(1==1), what it means is that when the condition is true
(“while(1==1)” is always true), anything inserted into the {} following the while loop will always run. The difference between an open and a closed loop in coding is that an open loop doesn’t require feedback and a closed loop does
(feedback is used in a closed loop). To insert a user-created function, you will use void function to avoid tediously inserting multiple lines of code over and over again. What the void function will do is it will make lines of code into one single line for
convenience. You can find all of the functions from the functions library. For every command that you make, you will need to insert a semicolon (;) directly after it. Commands like turnMotorOn or turnLEDOff will need a semicolon after it.
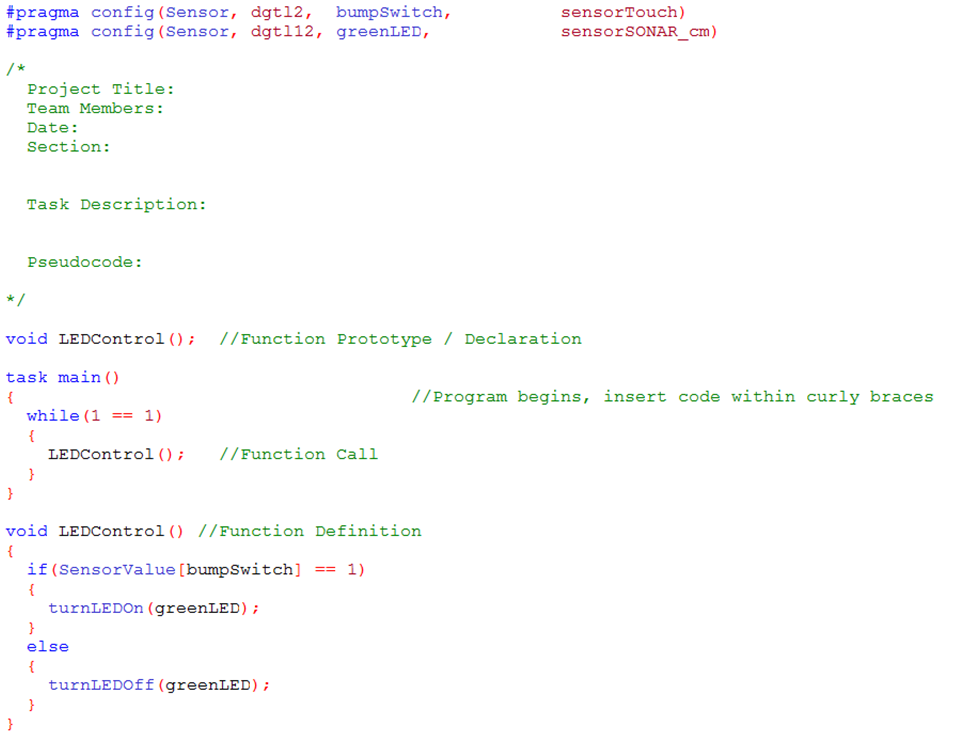
Here is an example of a task main, a simple command, a while loop, and a void function. The “void LEDControl ();” is a reference for the function (it’s initializing and declaring the function) and is located before the task main and the #pragm (the #pragm tells you the motors and senors set up). You can insert the if-else statement after the while statement, but to help clarify what a void function is, it isn’t in this example. The void function in this example is the “void LEDControl();.” Whenever “LEDControl” appears in the code, the program will substitute the definition of the void function in for the
“LEDControl”.
An if-else statement is helpful for programming. An if-else statement is similar to a true and false statement. If a condition is true, the code in {} will run. If a condition is false (or else) the code after the else statement in {} will run. In the picture above, the definition of the void function is an if-else statement. What the if-else statement above means is simple, if the button is pressed (remember that when a button is ==1, it’s pressed), turn off the green LED light, and if it isn’t pressed (else) turn the light on. The condition“else(SensorValue[bumpSwitch]==0)” isn’t needed because there is only one other possibility for the digital sensor.
A variable is another user-created function that is stored in the robots memory, and they make it easier to read and expand your program. A variable is initialized and declared before the task main (usually). To declare a variable, declare what type of data it is. Then you declare what it is by typing in the name of the variable. The data will turn blue and the name will remain black. Initialization and declaration is usually contracted into a single statement, for example:


Speed is initialized and then later declared, but on the bottom line it’s initialized and declared. In the next example, the variable will be referenced (a red arrow will point at the referenced variable):

This statement won’t change the variable, but it will change the direction of the motor when this line is executed.
Here is an example of an assignment:
Here is an example of an assignment:

When the assignment line is executed in this example, the speed will increase by one rotation. Note: the assignment in the example above can’t be coded as “speed+1=speed.”
There are two types of variables: a local and global variable. Here is an example of a local variable (preferred):
There are two types of variables: a local and global variable. Here is an example of a local variable (preferred):
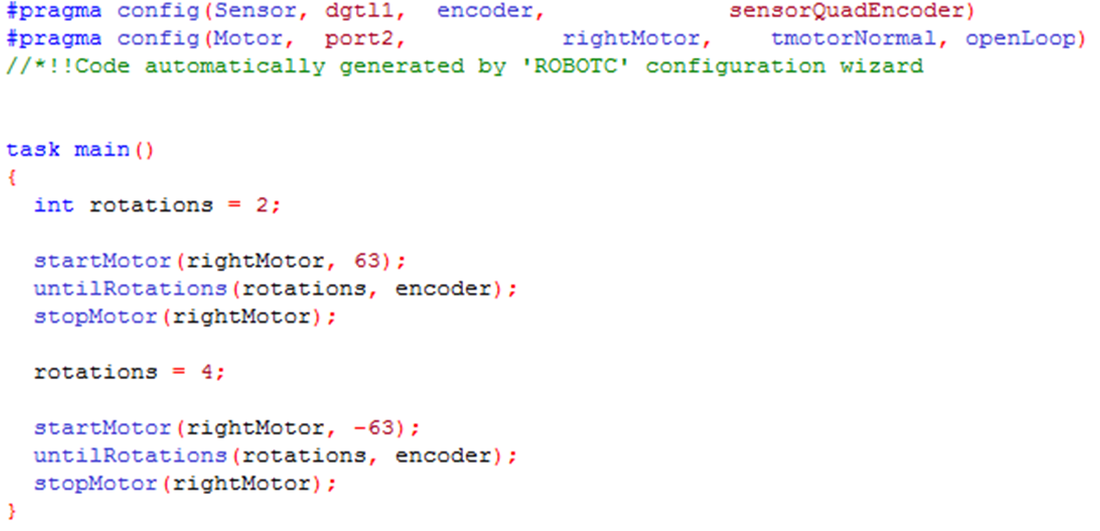
This type of variable is located inside the task main (it’s “local” to everything inside). The initialization statement and declaration statement is contracted in the example above and the rotations (variable name) is referenced twice. The first time it’s referenced is in the () after “untilRotations.” This is simply saying that until the rotations of the encoder are equal to two, stop the motor. The second time the variable is referenced is after the second “untilRotations.” The “rotations” is referencing the second declaration statement, and it’s saying this time that when the encoder rotates four times, stop the motor. Here is an example of a global variable:
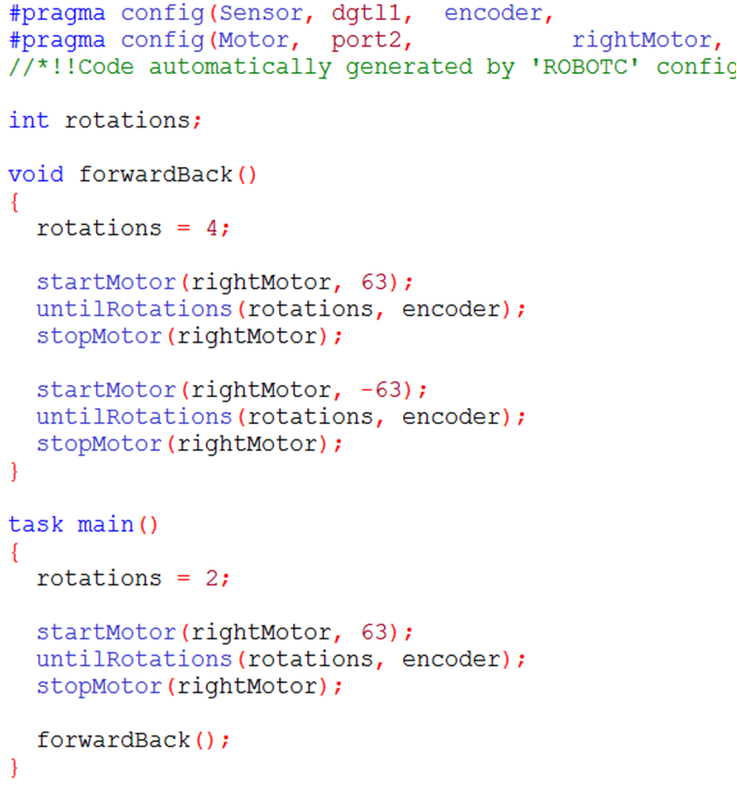
The variable is initialized before the code. The variable is “rotations” and it’s declared in the definition of the function and inside the task main. This code provides the same behaviors for the robot to perform as the other example. Inside the forwardBack() function, the “rotations” is declared to be four, and inside the task main the “rotations” is declared to be two. When the rotations are two and four, the motors will stop.
To set up your motors and sensors, go to the Robot tab on the ribbon and click on “Motors and Sensors Setup.” From there you can edit the names of the sensors that you have plugged in from the cortex. If you plugged in a red VEX LED light into port 3, from the Motors and Sensors Setup window you can edit the name to make it“emergencyLight” or anything that you would like to name it by typing in what you want into port 3. To the right of the box you will see a pop-down box, for this example you will select VEX LED, but you will select the proper motor or sensor plugged into that port. VEX Natural Language
uses “drinking camal notation,” and that’s the notation used when the functions and variables begin lowercase but then the second letter is uppercase (“emergencyLight” and“startMotor,” for example). Here are some examples of a Motors and Sensors Setup window:
Once you have made your code and have set-up all of the motors and sensors, you can now start the robot. Press the F7 to compile and download, and press the F5 button and a little window will appear. Make sure the “Refresh” is set at “continous” and then you can start the program. This window is called the debugger window.
This portfolio is an overview of PLTW VEX Robotics. Robots assist man in fascinating discoveries and help us explore new possibilities. With the help of robots, a person can now explore the surface of our neighbor planet Mars. With the help of robots, the police can now secure a location and arrest a criminal without risking any lives. With the help of robots, engineers
can now enrich the future with even more great inventions.
